Write a CSS stylesheet using notepad and see how you can create a webpage. CSS stands for cascading style sheet. CSS code is used to style an HTML document. When you create a website, a browser reads the HTML file and any CSS code, JavaScript, etc., written within the HTML. It then displays it according to what those codes tell it to do.
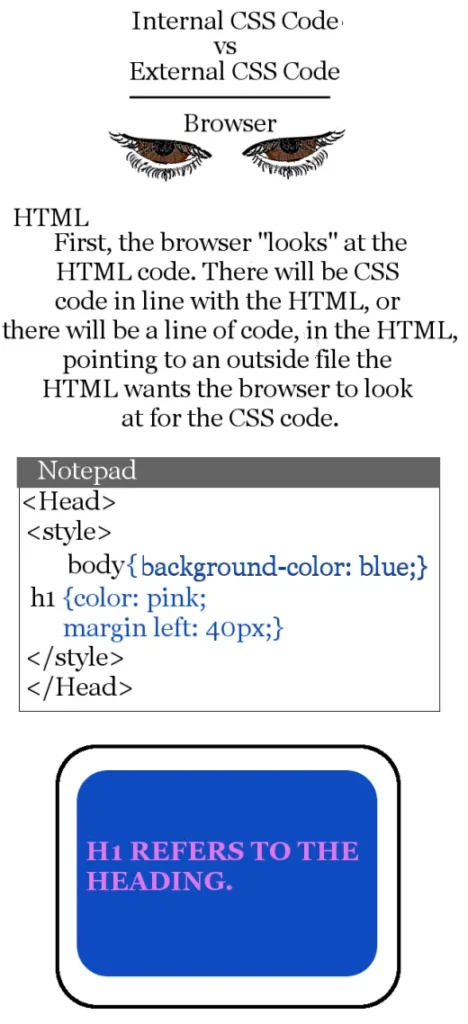
Sometimes the CSS code is written directly into the HTML. This is called an internal style sheet. The internal style is used when an entire page has the same style applied. For example the background. The code is written between the <head> and </head> tags using the <style> tag.
Other times the CSS code will affect only a specific phrase, word or paragraph. This is called an inline style sheet. It is written on the same line that it is to affect using the <style> tag and the attribute that is to be applied.
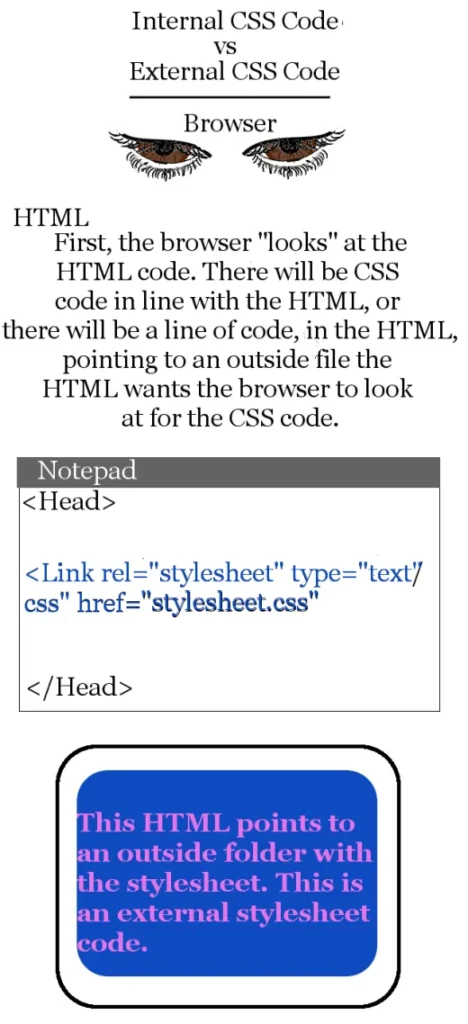
When a website has several pages, an external CSS is used. This is the type of style sheet we will go over today. The external style sheet can be applied to several HTML documents. When the CSS code is altered, it will affect all the pages. An entire website can be formatted from one style sheet. This saves a lot of time since you won’t have to modify every single page of a website.
By entering the <link> tag, the browser reads the file you have entered a link to and applies it across all the pages of the website.
The <link> tag is a pointer that is placed inside the <head> and </head> tags of the HTML document.
Any text editor can be used to write a CSS style sheet. Today we will use Notepad.
Basic HTML and CSS Tags, Elements, and Properties for a Web Page
| NOTATION | WHAT IT WILL DO ON YOUR WEB PAGE | EXAMPLE |
|---|---|---|
| <>, </> | The open and close brackets used on elements to indicate to the browser this is the beginning <> and </ > this is the end of the specified elements. IE what you want to see on your web page and how you want to see it. The <> starts the statement and </> closes it. | <body>Here you have told the browser this is the beginning of the body. When you have entered what you want in the body section you MUST close with the </body>. |
| <p>, </p> | The opening and closing paragraph tags. This will display as the paragraph section. | <p>Write your content between these brackets.</> |
| <h1>, <h2>, <h3> up to <h10> | Use these tags to indicate which heading you want displayed. The number 1-10 indicates which size heading you desire. <h1> being the largest. | <h1> Is the largest heading</h1>. <h2>Is the next size down.</h2>. <h3>Is even smaller.</h3> And so on. |
| {property:value;} | A declaration specifies the property and the value of an item how you want it to show up. | {color:red: font-size:12px;} or {font-style:italic:} |
| Colon : and the Semicolon ; | Your declaration property MUST have a : (colon) after it. The value MUST have the ; (semicolon) after it as shown. | {color:red; font-size:12px;} |
| <style> </style> | These are the start and close style tags. They tell browsers how you want the HTML display to look. This is where you would use an Internal or In-line style. | <head> <style>h1{color:red; font-size:12px;} p{color:blue; font-family:georgia; font-size:12px;}</style>>/head> |
| <link> </link> | These are the start and close link tags. You would place your link to an external style sheet between these tags. | <head><link rel=”stylesheet” type=”text/css”href=”mystyle.css”></head> . This links to an external style sheet with the name and extension “mystyle.css” |
The elements, tags and styles, are written in lower case.
HTML Element Basics
As you can imagine, there is a plethora of choices to add, alter and personalize your web page. The point I’m trying to make here is to give you enough information to get something you have created to display on your internet explorer like a web page. Once you have learned how to display it, then you can start manipulating it to look the way you want it to.
To present a page you have created to the world on the World Wide Web you would need to purchase a website to place your page on, and hire hosting to display it when someone types your web address into the search bar. But that’s getting way ahead of ourselves. Let’s get the HTML element basics working first!
The table above displays and explains the basic HTML and CSS elements and some of the property elements you want to see when you display your web page.
If an external link is placed after the internal style sheet in the HTML <head> section the external will take precedence over the internal style sheet.
First we will create the basic HTML document and view it on your browser.
The following HTML document has some of the most common elements you will find. You will get to know them very well over time because they are the foundation of the HTML page. Using Notepad we will create a web page and link an external CSS to it.
Click start -> All Programs -> Notepad
Enter the following code:
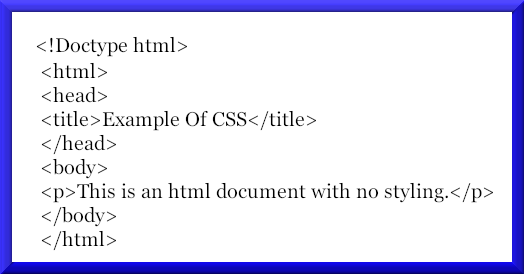
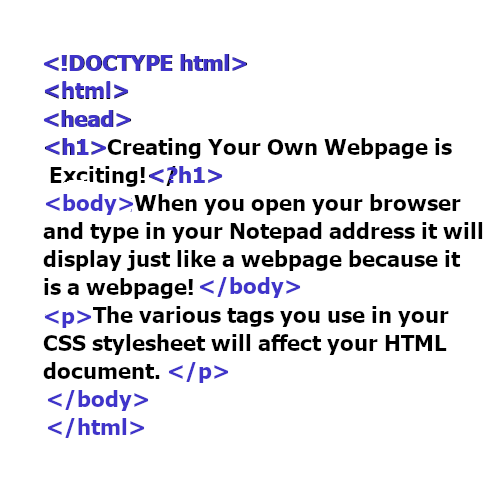
Plain HTML Document

Tags Defined
After you have written the HTML code save it somewhere like your desktop for easy retrieval. Use the file extension .htm or .html.
The code you just entered tells the browser, line by line, what to display.
The first line is important because it tells the browser what type of document it is reading.
Entering <!DOCTYPE html> tells the browser it’s an HTML document.
The <html> tells the browser, here’s the start of the web page. </html> tells it, this is the end of the web page.
The <body> tag tells the browser that this is what I want to appear on the screen. The body tag ends with </body> tag.
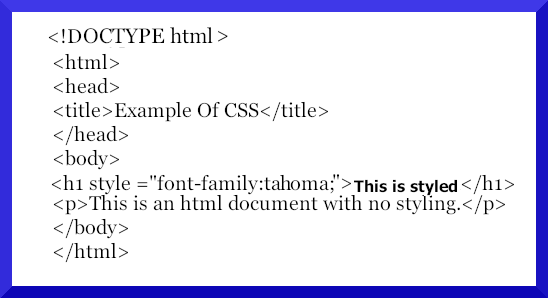
Entering <h1> tells the browser this is the first heading. Indicating number one will make the heading appear larger than the rest of the text. H2 is smaller than h1, h3 is smaller, h4 is even smaller and so on.
Paragraphs start with <p> and end with </p>.
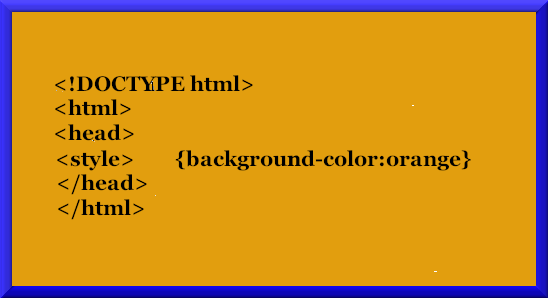
Create a CSS File
Now open a new Notepad document. Click Start ->All Programs -> Notepad. This is going to be the CSS file that we put a link to.
Enter the following code:
body
{
background-color:yellow
}
{
font-family:”Georgia”;
font-size:30px;
}
Click Save and name it something like “mystyle” (minus the quotes). Save it as a .css file type.
Link the Style Sheet
Change the Color of the Text
Now we will add a link to the .css file you just created in the HTML document that will change the background color, the font type and the size of the font displayed.
Locate your HTML document and open it.
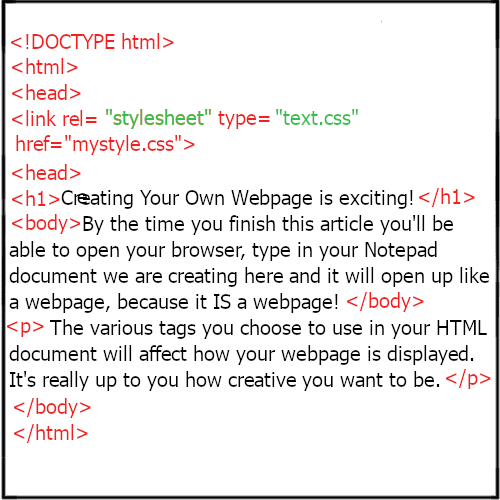
Add the following <link> to the HTML after the <head> section. (Insert the name in which you saved your .css file if it is different than the suggested mystyle.css): <link rel=”stylesheet” type=”text/css” href=”mystyle.css”>
This tells the browser you’re using a style sheet and it is in the format of text/css and to retrieve it in “mystyle.css”
So now your HTML looks like the code below.
HTML With Link to Style Sheet
Check Out the Results
Save your HTML with the same name as you chose before and click ok if it asks to overwrite the current one.
Open up your browser click on File -> Open -> Browse-> and browse to your HTML file and click on it it, click ok and your page should appear. It should look similar to the picture below.
Just changing the name of the color in your .css file will change the output and the same goes for the font and size of the font.Website Development Shortcut
As you have learned, writing HTML is meticulous. Every semicolon, every bracket, every closing / must be in place or the browser won’t display it correctly, or at all. This can be HIGHLY frustrating when your page won’t display, or displays wrong, and you have to go through line after line of your code looking for what you missed (Yes, what you missed. Browsers don’t read wrong.)
If you will be writing more than one page of HTML, or just don’t want to forget how to write it, you can simplify the process by saving a template, or commonly called a frame of the HTML that you know works. Then, when you need to write an HTML page all you need to do is open your frame and fill in the details! See an example of a frame below (you can copy the following frame if you wish).