Affiliate Disclosure: We rely on high-quality tools and products for our guides. As an Amazon Associate, we earn from qualifying purchases made through the links below. Rest assured, this does not affect the price you pay for any product. We only recommend products we trust and use.
Car Parts Under the Hood
If you want to begin your path to automotive self-reliance, then you’ll need a general idea of what’s under the hood of your car.
Don’t expect to remember everything in this article right off the bat. Learning basic car maintenance takes practice, just like riding a bike for the first time or learning a new language. Intuition for parts and fixing random things will develop over time as you work more on your car. One day when you’re trying to remove the fan shroud but “that stupid thingy is in the way,” you’ll remember that “thingy” in the way is the alternator!
Tips for Learning About Your Car Parts
- Not every engine is the same. Two common engine types are V6 and V8. They are described below.
- The oil dipstick, transmission dipstick, and radiator location are all crucial to frequent car maintenance for a vehicle owner.
- It’s a good idea to have a shop manual for your specific vehicle. There are specifications and instructions for each make, model, and year of a car or truck that often prove to be invaluable. Clymer and Haynes are two top-selling manual publishers.

Preparing to Investigate: Pull Your Hair Back and Dig In
Safety First
People with long locks: You may want to pull your hair back, especially if you’re going to check your transmission fluid. The vehicle must be running to get an accurate reading of the transmission fluid, and I guarantee that you don’t want the engine to get a hold of your hair. If your hair gets caught in a belt or fan, the engine will win that tug-of-war! Pull it into a ponytail or better yet, a bun for now. You don’t need to remove your acrylic nails to explore the engine with me today.
What Is a V8 Engine?
Let’s start off by identifying the early model V8. V8 indicates that the engine has eight cylinders with two rows, four on one side and four on the other side. Inside each of these eight cylinders are pistons. Pistons are the rods that move up and down with kinetic energy and are adjacent to each other on the crankshaft. As the piston goes up and down, during the combustion phase, in the engine, the piston turns the crank.
When the crank turns the force is transferred to the drive wheels which, in turn, make the car roll!
Electrical energy is transmitted through the spark plug wires to the spark plug which is mounted on top of each cylinder. The electric spark causes the fuel in the cylinder to explode. The explosion forces the piston down, which is the power stroke that creates the power to turn the crank.
The cylinders and the pistons are set in a “V” pattern, hence V8. The engine displacement is 454 cubic inches. Huge engines of this size are used for racing or hauling heavy items.
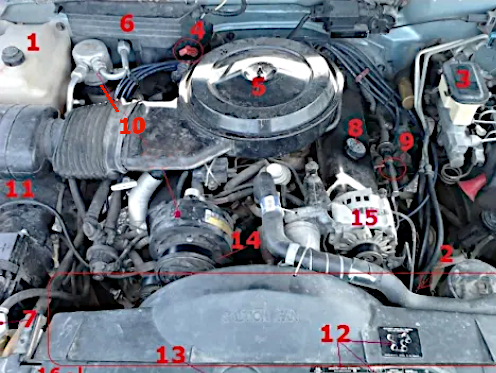
Example 1: Component Key for a 1989 454 V8 1-Ton Engine
- Radiator Reservoir: Radiator reservoir is used for coolant overflow.
- Power Steering Check-and-Fill: Use the same hole to check and fill the power steering fluid.
- Brake Fluid Reservoir: Check the fluid level and top off the brake fluid here.
- Transmission Dipstick: Fill and check transmission fluid through this hole. The engine must be running to check the transmission fluid properly; see the Safety Precautions section below.
- Air Filter: The air filter is located on top of the carburetor to supply the carb with clean air.
- Fuse Box: This is one of two fuse boxes; another fuse box is located inside the car.
- Radiator Cap: Never open the radiator cap when it’s hot. Squeeze the hose to feel for pressure and heat before opening.
- Engine Oil Fill Cap: Remove the engine oil fill cap to add oil after checking the oil levels via the dipstick. The engine oil dipstick is identified at number 9.
- Dipstick: The dipstick is used to check engine oil. Once the engine is warm and shut off, pull the dipstick out of the hole and wipe it off. Stick it back into the hole carefully, and slowly remove it. Observe where the engine oil falls on the measuring stick. If the oil falls below both notches on the meter, the engine needs more oil.
- Air Conditioning Components: Don’t mess with the air conditioning components. The air conditioning compressor contains lots of freon under pressure.
- Battery: The battery is crucial to access when jumping your car or another person’s vehicle.
- Information Labels: These labels provide information about your specific vehicle.
- Hood Latch: The hood latch is used to access under the hood. Typically, a button or lever inside the vehicle on the driver’s side pops the hood to allow access to the hood latch.
- Serpentine Belt: The serpentine belt wraps around all the pulleys in the engine.
- Alternator: The alternator generates electrical power to keep the engine running and recharges the battery.
- Fan Shroud: The fan shroud assists with cooling the vehicle.
What Is a “Sideways” Engine?
Let’s look at a 1996 high-performance engine. The following engine is a 2.5L V6 24-valve Chrysler engine that is positioned sideways. What does each of these things mean?
- 2.5L: The number of liters indicates the size of the engine.
- V6: “V” indicates the engine shape and “6” points to the total number of cylinders.
- 24 valve: “24 valve” means there are two intake and two exhaust valves in each of the six cylinders.
This engine is said to be “sideways.” Instead of facing front to back when you open the hood, the engine is facing right to left. The accessory belts are located on the left side facing the passenger-side wheel. Figure 3 details the parts of a “sideways” engine.
Valve Calculation
(2 intake valves + 2 exhaust valves) x 6 cylinders = 24 total valves
Can’t Find the Battery?
A couple of car makers position the battery in difficult spots. On some Chrysler models, such as the 2004 Chrysler Sebring, the battery is located in one of the oddest places I’ve ever seen: in front of the driver-side wheel. In order to access the battery on this particular make of vehicle, you must:
- On the front driver’s side, inside the wheel well there is an access to the battery.
- Turn the steering wheel to the left, until you see inside the wheel well on the front driver’s side.
- Remove the inside wheel well panel to expose the battery box.
- Once the panel is removed, you will see the battery.
Another such vehicle is a Corvette. The battery, primarily on older models, is located behind the driver’s seat in a box under the carpet.
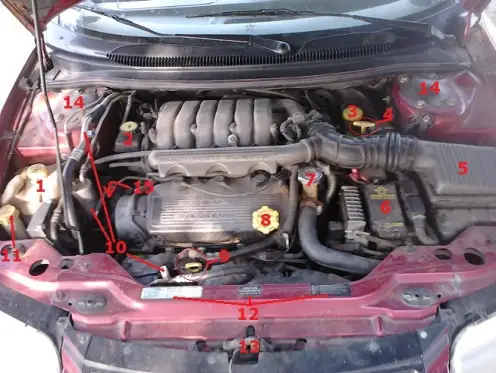
Example 2: Component Key for a 2.5L V6 24-Valve Chrysler Engine
- Radiator Reservoir: Radiator reservoir is used for anti-freeze overflow.
- Power Steering Check-and-Fill: Use the same hole to check and fill the power steering fluid.
- Brake Fluid Reservoir: Check the fluid level and top off the brake fluid here.
- Transmission Dipstick: Fill and check transmission fluid through this hole. The engine must be running to check the transmission fluid properly; see Safety Precautions below.
- Air Filter: The air filter is located on top of the carburetor to supply the carb with clean air.
- Fuse Box: This is one of two fuse boxes; another fuse box is located inside the car.
- Radiator Cap: Never open the radiator cap when it’s hot. Squeeze the hose to feel for pressure and heat before opening.
- Engine Oil Fill Cap: Remove the engine oil fill cap to add oil after checking the oil levels via the dipstick. The engine oil dipstick is identified at number 9.
- Dipstick: The dipstick is used to check engine oil while the engine is off.
- Air Conditioning Components: Don’t mess with the air conditioning components. The air conditioning compressor contains lots of freon under pressure.
- Windshield Washing Fluid: Windshield washing fluid is crucial for cleaning the windshield while driving and should be checked regularly.
- Technical Labels: Labels for SMOG, A/C, spark plugs, etc. The information on these labels pertains to your specific vehicle.
- Hood Latch: The hood latch is used to access under the hood. Typically, a button or lever inside the vehicle on the driver’s side pops the hood to allow access to the hood latch.
- Access to Shock Absorbers: Shock absorbers absorb shock impulses. Leave tampering with these to a licensed mechanic.
Safety Precautions
Transmission
When checking the transmission fluid, the engine should be warmed up and running for a proper reading.
Be very careful of moving parts and wires, especially with hair or dangling/loose clothing! If your hair or a scarf is near the serpentine belt, the breeze caused by the fan could lead it to catch the belt. This could pull your head or neck towards the engine. Please be careful!
Cooling System
If you find your car overheating, do not remove the radiator cap (Figure 3, number 7). Pressure builds under the radiator cap in the cooling system as a car runs. Open the hood so cool air can blow over the engine. Wait until the temperature gauge inside your vehicle has gone down to zero degrees.
Never spray or “hose down” a hot engine. When your car overheats and you turn it off, spraying cold water on it may crack the engine! The severe temperature change is too much for the metal.
Overheated Engine Tip
You can slowly pour water on the radiator only while the engine is still running. This and time are the only two things that will safely cool down your engine. Sitting on the side of the road waiting for the engine to cool down is a bummer, but the alternatives will damage the engine or you. Do not try any other method for cooling your engine.
Final Tips
Parts That Require a Technician
In Figure 3, the heavy-duty fuse box (6) and the air conditioning components (10), both require a licensed technician. There’s nothing you can do for these components, so leave those to the experts.
Easy Fluid Check
Check your power steering fluid, engine oil, radiator fluid, and transmission fluid regularly. Fill or top off as needed and check your owner’s manual to determine when your vehicle needs to be serviced.
Battery Replacement
Batteries need to be replaced about every two to three years. Remove the negative terminal first, then the positive. Automotive batteries can be very heavy, and some are upwards of 20+ pounds, so be careful when you’re lifting it out and putting the new one in. Be sure to have the terminals on the correct side, positive to positive and negative to negative. Attach the terminals by connecting the positive first and then the negative.
Words of Encouragement
If you feel overwhelmed, relax. Like learning anything, basic auto maintenance takes repetition and practice, and occasionally making a few mistakes. You can’t “hurt” your car just by looking around under the hood or checking the fluids. You can increase the longevity of your car by checking under the hood early and often to catch problems before they begin!
© 2012 Joanna